Proxmox VE: Install, Cluster, and Clean Up the Subscription Nag
A practical walkthrough for installing Proxmox VE, building a multi-node cluster, and using Community-Scripts to get rid of the enterprise repo warnings.

Why Proxmox VE
Proxmox VE is a Debian-based hypervisor that bundles KVM (full virtualization) and LXC (lightweight containers) under one web UI, with clustering, live migration, and backups built in from day one. It’s free, open source, and it’s the backbone of most self-hosted homelabs — including this one.
This post covers the three things people usually search for right after downloading the ISO:
- Installing Proxmox VE
- Turning multiple standalone nodes into a cluster
- Getting rid of the “No valid subscription” popup using Community-Scripts instead of hand-editing APT sources
🛠️ Installing Proxmox VE
0. Get the ISO onto a USB stick
Grab the ISO from proxmox.com/downloads and flash it with balenaEtcher, Rufus, or plain dd. Boot the target machine from it.
1. Interface selection
The installer asks for Graphical, Terminal UI, or Terminal UI (serial console). Graphical is fine for most homelab hardware; the Terminal UI options exist mainly for servers with picky/unsupported GPUs or that only expose a serial console (iDRAC/iLO/IPMI over serial).
2. License agreement
Accept the Proxmox VE EULA to continue. Nothing to decide here.
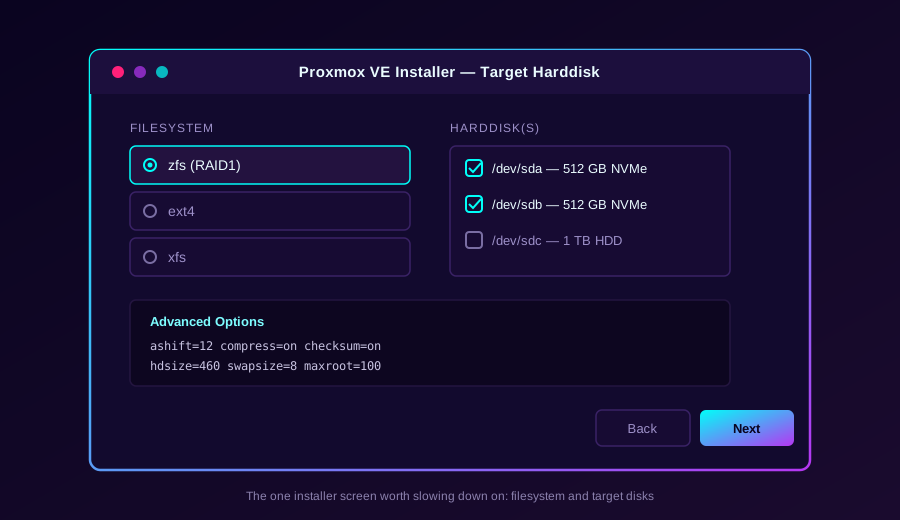
3. Target disk & filesystem
This is the screen worth slowing down on:
ext4on top of LVM if you just want a single-disk, simple setup.- ZFS (RAID1/RAIDZ) if you have multiple disks and want checksummed storage, snapshots, and native replication between cluster nodes without extra tooling. This is the option I use across my nodes — VMs and containers on ZFS (especially on NVMe, with
ashift=12and compression on) are noticeably snappier than the same setup on ext4/LVM, and you get free storage-level replication as a bonus. Unless you have a specific reason not to, install on ZFS.
Under Advanced Options you can tune ashift (leave at 12 for anything SSD/NVMe), compression (on), and how much of the disk to actually use (hdsize) if you want to leave space unpartitioned.
4. Localization
Country, timezone, and keyboard layout. This also seeds the default mirror Proxmox uses for package downloads, so pick the real country, not just a layout you like.
5. Root credentials
Set the root password and an admin email address. There’s no default password — you set it here, and it’s the same credential you’ll use for both the web UI and SSH until you set up key-based auth.
6. Network configuration
Set the management interface, hostname (FQDN), and a static IP/netmask/gateway/DNS. Don’t leave this on DHCP — every node in a future cluster needs a stable, resolvable address, and a lease that changes later will break corosync.
Give every node its final hostname (
pve01,pve02, …) right here, before anything else touches the system. Renaming a node after it has joined a cluster is painful — corosync and/etc/hostsboth need to agree, and it’s easy to end up with a broken quorum.
7. Summary & install
Review everything, optionally tick “Automatically reboot after successful installation”, and confirm. The installer copies itself to disk from here — no more input needed.
8. First boot
The console shows a login prompt and the HTTPS URL for the web UI, e.g. https://192.168.1.50:8006. Open that from another machine on the network (self-signed cert, your browser will complain — that’s expected) and log in as root with the password from step 5.
🔔 The “No valid subscription” nag
First login, and Proxmox greets you with a popup every time you open the UI: “You do not have a valid subscription for this server.” This isn’t a trial expiring — it’s Proxmox telling you that this node is pointed at the enterprise repository, which requires a paid support subscription to use.
For a homelab, you don’t want the enterprise repo at all — you want the free pve-no-subscription repository, and you want the nag gone.
The manual fix is well documented: comment out pve-enterprise.list, add the no-subscription repo, and patch a line in /usr/share/javascript/proxmox-widget-toolkit/proxmoxlib.js to stop the popup from firing. It works, but:
- It has to be redone by hand on every node.
- The JS patch gets silently overwritten on the next
pve-managerpackage update.
That’s tedious enough that I stopped doing it by hand.
⚡ Community-Scripts: post-pve-install
Community-Scripts (the actively maintained continuation of tteck’s original Proxmox VE Helper-Scripts) ships a script specifically for this: post-pve-install. Run it from the Proxmox shell (as root, on each node):
1
bash -c "$(curl -fsSL https://raw.githubusercontent.com/community-scripts/ProxmoxVE/main/tools/pve/post-pve-install.sh)"
Always know what you’re piping into
bash. Community-Scripts is a well-known, widely audited project in the Proxmox community, but as a rule: for anything less established, read the script first (curl -fsSL <url> | less) before running it as root.
It drops you into an interactive whiptail menu where you tick the boxes you want:
- Correct Proxmox VE sources — sets up the proper Debian Bookworm/Trixie base repos.
- Disable the
pve-enterpriserepository — comments it out soaptstops trying to hit a repo you’re not licensed for. - Enable
pve-no-subscription— adds the free repository that gets you full package updates. - Correct the Ceph package sources — same enterprise/no-subscription split, if you’re running Ceph.
- Add the (disabled)
pvetestrepository — for anyone who wants early access to point releases, off by default. - Disable the subscription nag — patches the web UI and mobile interface so the popup stops appearing, in a way the script can safely reapply after updates.
- Enable / disable High Availability — turns
pve-ha-lrm,pve-ha-crm, andcorosyncon or off depending on whether this is a single node or part of a cluster. - Update Proxmox VE now — runs
apt update && apt dist-upgradeat the end. - Reboot — optional, recommended after a kernel update.
Run it once per node, right after install, and again after major version upgrades (8.x → 9.x) since the repo format changes (Proxmox 9 moved to the deb822 .sources format, and the script handles migrating that too).
🧩 Building the cluster
Once every node is installed, updated, and has a static IP and clean hostname, joining them into a cluster takes minutes.
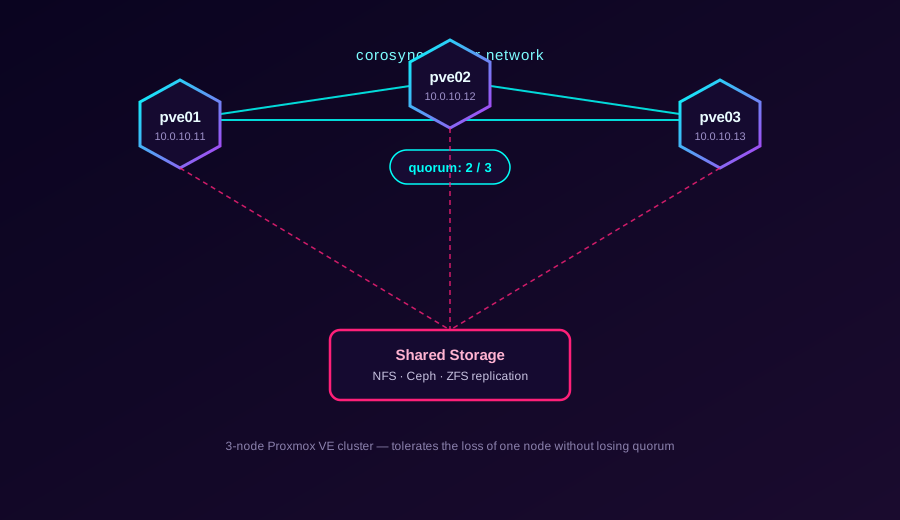
On the first node (pve01), create the cluster:
1
pvecm create homelab-cluster
On every other node (pve02, pve03, …), join it:
1
pvecm add 10.0.10.11
You’ll be asked to confirm the fingerprint of pve01 and enter its root password once. That’s it — the node reconfigures corosync and shows up in the Datacenter view of every node’s web UI within a few seconds.
Verify from any node:
1
2
pvecm status
pvecm nodes
Corosync is latency-sensitive. For anything beyond a lab with three nodes on the same switch, put cluster traffic on its own VLAN or NIC — a saturated shared network causing corosync timeouts is the single most common cause of a cluster losing quorum and fencing itself.
Quorum, in one paragraph
A Proxmox cluster needs a majority of nodes online to stay quorate — that’s floor(n/2) + 1. Three nodes tolerate losing one. Two nodes tolerate losing… none, effectively, unless you add a lightweight third vote (a QDevice) that doesn’t run any workloads but still gets a say in quorum. If you’re building a 2-node cluster, set up a QDevice — running two nodes without one is a common trap that turns a single reboot into an unplanned full outage.
Ceph is generally not worth it for a homelab
Clustering gives you centralized management and the ability to live-migrate VMs between nodes. Live migration without downtime normally implies shared storage, and the moment “shared storage” comes up, people jump straight to Ceph. I’d actively steer you away from it unless you already know you need it. Ceph wants several disks dedicated as OSDs on every node to be reliable and to perform decently — this isn’t a “one extra disk” setup, it’s real hardware investment across the whole cluster — plus a network that can keep up with the replication traffic. Skimp on any of that and you spend your weekends fighting slow OSDs and degraded placement groups instead of running VMs.
The combination of Proxmox’s built-in HA plus ZFS storage replication (below) covers what most homelabs actually need — automatic failover with a small, known RPO — without any of that overhead. Save Ceph for when you’re deliberately building real distributed storage and know why.
ZFS storage replication (the option most homelabs actually want)
Proxmox has a much lighter built-in alternative: storage replication, using ZFS send/receive under the hood. Each node keeps its VM disks on local ZFS storage, and Proxmox periodically ships the incremental changes to one or more other nodes on a schedule you control — as often as every minute. No shared storage, no Ceph cluster to babysit, just local disks that quietly stay in sync.
Set it up from Datacenter → Storage Replication → Add, or from the CLI:
1
2
# Replicate VM 101 to node pve02 every 5 minutes
pvesr create-local-job 101-0 pve02 --schedule "*/5"
Check the state of all replication jobs:
1
pvesr status
If pve01 goes down, combine this with HA (Datacenter → HA → Add) and Proxmox will start the VM on pve02 using the most recent replica automatically. The trade-off versus real shared storage: your RPO is the replication interval, not zero — if the node dies 90 seconds after the last sync, you lose those 90 seconds. For most homelab workloads (and even a lot of production ones), a 1-5 minute RPO in exchange for not running Ceph is an easy trade.
Storage replication only works between ZFS storage of the same name on both nodes, and it doesn’t replicate LXC containers on non-ZFS storage or disks with snapshots it doesn’t manage cleanly. Keep VM disks on ZFS from the start if you plan to rely on this.
Local-disk nodes without any replication can still migrate — just with a brief offline copy step instead of a live one, which is fine for planned maintenance even if it’s not HA-grade.
✅ Checklist
- Static IP + proper hostname set before installing
post-pve-installrun on every node (enterprise repo off, no-subscription on, nag disabled)- Nodes updated and rebooted onto the same PVE version before clustering
- Cluster created, all nodes joined,
pvecm statusshows full quorum - Dedicated network/VLAN for corosync if it’s more than a weekend lab
- QDevice configured if you’re running exactly 2 nodes
- Shared storage (Ceph/NFS) for true live migration, or ZFS storage replication + HA if you don’t need/want Ceph
That’s the whole path from a blank USB stick to a quorate, nag-free cluster.